St. Patrick's Day 2020: verschil tussen versies
Geen bewerkingssamenvatting |
Geen bewerkingssamenvatting |
||
| Regel 15: | Regel 15: | ||
[[File:Patrick2.gif|center|link=]]<br> | [[File:Patrick2.gif|center|link=]]<br> | ||
Klavertjes [[File:Stpatrick icon idlecurrency.png|link=|25px]] worden gebruikt om jouw fabrieken te verbeteren, waarmee je de productie verhoogt. Je kan ook jouw boot verbeteren of het festival, om de hoeveelheid goederen die worden verplaatst te verhogen of de hoeveelheid goederen die het festival kan verwerken te verbeteren. Wanneer je veel veel klavertjes [[File:Stpatrick icon idlecurrency.png|link=|25px]] hebt verzameld en de producties niet 1 voor 1 wil verhogen kan je de 'max' optie in de linker bovenhoek gebruiken om ze sneller te upgraden! Je kan potten goud [[File:Stpatrick image currency event.png|link=|25px]] uitgeven om direct 2, 4 of 8 uur aan productie te ontvangen via de stopwatch linksbovenin, een snelle manier om wat extra klavertjes [[File:Stpatrick icon idlecurrency.png|link=|25px]] te produceren! | |||
=== Het festival === | === Het festival === | ||
| Regel 43: | Regel 41: | ||
{| style="width: 40%; | {| style="width: 40%; | ||
!style="text-align: center; font-weight: bold; background-color:#145E3D;"|Levels | !style="text-align: center; font-weight: bold; background-color:#145E3D;"|Levels | ||
!style="text-align: center; font-weight: bold; background-color:#145E3D;"| | !style="text-align: center; font-weight: bold; background-color:#145E3D;"|Verhoging | ||
|- | |- | ||
!style="text-align: center; font-weight: bold;"|1-10 | !style="text-align: center; font-weight: bold;"|1-10 | ||
| Regel 68: | Regel 66: | ||
{| style="width: 50%; | {| style="width: 50%; | ||
!style="text-align: center; font-weight: bold; background-color:#145E3D;"| | !style="text-align: center; font-weight: bold; background-color:#145E3D;"|Gebouw | ||
!style="text-align: center; font-weight: bold; background-color:#145E3D;"| | !style="text-align: center; font-weight: bold; background-color:#145E3D;"|Omschrijving | ||
!style="text-align: center; font-weight: bold; background-color:#145E3D;"| | !style="text-align: center; font-weight: bold; background-color:#145E3D;"|Kosten <br> | ||
|- | |- | ||
!style="text-align: center; font-weight: bold; background-color:#145E3D;" |[[File:Stpatrick task hatfactory large.png|link=|100px]] | !style="text-align: center; font-weight: bold; background-color:#145E3D;" |[[File:Stpatrick task hatfactory large.png|link=|100px]] | ||
|style="text-align:center;"| | |style="text-align:center;"|Hoedenfabriek. | ||
|style="text-align: center; font-weight: bold;"| | |style="text-align: center; font-weight: bold;"|Gratis <br> | ||
|- | |- | ||
!style="text-align: center; font-weight: bold; background-color:#145E3D;" |[[File:Stpatrick task flowerfactory large.png|link=|100px]] | !style="text-align: center; font-weight: bold; background-color:#145E3D;" |[[File:Stpatrick task flowerfactory large.png|link=|100px]] | ||
|style="text-align:center;"| | |style="text-align:center;"|Bloemenfabriek. | ||
|style="text-align: center; font-weight: bold;"|1.1K [[File:Stpatrick icon idlecurrency.png|link=|25px]] <br> | |style="text-align: center; font-weight: bold;"|1.1K [[File:Stpatrick icon idlecurrency.png|link=|25px]] <br> | ||
|- | |- | ||
!style="text-align: center; font-weight: bold; background-color:#145E3D;" |[[File:Stpatrick task cakefactory large.png|link=|100px]] | !style="text-align: center; font-weight: bold; background-color:#145E3D;" |[[File:Stpatrick task cakefactory large.png|link=|100px]] | ||
|style="text-align:center;"| | |style="text-align:center;"|Taartenfabriek. | ||
|style="text-align: center; font-weight: bold;"|1.2M [[File:Stpatrick icon idlecurrency.png|link=|25px]] <br> | |style="text-align: center; font-weight: bold;"|1.2M [[File:Stpatrick icon idlecurrency.png|link=|25px]] <br> | ||
|- | |- | ||
!style="text-align: center; font-weight: bold; background-color:#145E3D;" |[[File:Stpatrick task factory large.png|link=|100px]] | !style="text-align: center; font-weight: bold; background-color:#145E3D;" |[[File:Stpatrick task factory large.png|link=|100px]] | ||
|style="text-align:center;"| | |style="text-align:center;"|Drankfabriek. | ||
|style="text-align: center; font-weight: bold;"|1.5B [[File:Stpatrick icon idlecurrency.png|link=|25px]]<br> | |style="text-align: center; font-weight: bold;"|1.5B [[File:Stpatrick icon idlecurrency.png|link=|25px]]<br> | ||
|- | |- | ||
!style="text-align: center; font-weight: bold; background-color:#145E3D;" |[[File:Stpatrick task firefactory large.png|link=|100px]] | !style="text-align: center; font-weight: bold; background-color:#145E3D;" |[[File:Stpatrick task firefactory large.png|link=|100px]] | ||
|style="text-align:center;"| | |style="text-align:center;"|Vuurwerkfabriek | ||
|style="text-align: center; font-weight: bold;"|111B [[File:Stpatrick icon idlecurrency.png|link=|25px]] <br> | |style="text-align: center; font-weight: bold;"|111B [[File:Stpatrick icon idlecurrency.png|link=|25px]] <br> | ||
| Regel 100: | Regel 98: | ||
!style="text-align: center; font-weight: bold; background-color:#145E3D;"|Levels | !style="text-align: center; font-weight: bold; background-color:#145E3D;"|Levels | ||
!style="text-align: center; font-weight: bold; background-color:#145E3D;"|[[File:Stpatrick image manager market.png|link=|100px]]Festival Manager | !style="text-align: center; font-weight: bold; background-color:#145E3D;"|[[File:Stpatrick image manager market.png|link=|100px]]Festival Manager | ||
!style="text-align: center; font-weight: bold; background-color:#145E3D;"|[[File:Stpatrick image manager transport.png|link=|100px]] | !style="text-align: center; font-weight: bold; background-color:#145E3D;"|[[File:Stpatrick image manager transport.png|link=|100px]] Scheepswerf Manager | ||
!style="text-align: center; font-weight: bold; background-color:#145E3D;"|[[File:Stpatrick image manager hats.png|link=|100px]] | !style="text-align: center; font-weight: bold; background-color:#145E3D;"|[[File:Stpatrick image manager hats.png|link=|100px]] Hoedenfabriek Manager | ||
!style="text-align: center; font-weight: bold; background-color:#145E3D;"|[[File:stpatrick_image_manager_flowers.png|link=|100px]] | !style="text-align: center; font-weight: bold; background-color:#145E3D;"|[[File:stpatrick_image_manager_flowers.png|link=|100px]]Bloemenfabriek Manager | ||
!style="text-align: center; font-weight: bold; background-color:#145E3D;"|[[File:Stpatrick image manager cakes.png|link=|100px]] | !style="text-align: center; font-weight: bold; background-color:#145E3D;"|[[File:Stpatrick image manager cakes.png|link=|100px]]Cakefabriek Manager | ||
!style="text-align: center; font-weight: bold; background-color:#145E3D;"|[[File:Stpatrick image manager factory.png|link=|100px]] | !style="text-align: center; font-weight: bold; background-color:#145E3D;"|[[File:Stpatrick image manager factory.png|link=|100px]]Drankfabriek Manager | ||
!style="text-align: center; font-weight: bold; background-color:#145E3D;"|[[File:Stpatrick image manager fireworks.png|link=|100px]] | !style="text-align: center; font-weight: bold; background-color:#145E3D;"|[[File:Stpatrick image manager fireworks.png|link=|100px]]Vuurwerkfabriek Manager<br> | ||
|- | |- | ||
!style="text-align: center; font-weight: bold; background-color:#145E3D;"|Level 1 | !style="text-align: center; font-weight: bold; background-color:#145E3D;"|Level 1 | ||
| Regel 181: | Regel 179: | ||
{| style="width: 100%; | {| style="width: 100%; | ||
!style="text-align: center; font-weight: bold; background-color:#145E3D;"| | !style="text-align: center; font-weight: bold; background-color:#145E3D;"|Beloningskist | ||
!style="text-align: center; font-weight: bold; background-color:#145E3D;"| | !style="text-align: center; font-weight: bold; background-color:#145E3D;"|Eerste | ||
!style="text-align: center; font-weight: bold; background-color:#145E3D;"| | !style="text-align: center; font-weight: bold; background-color:#145E3D;"|Tweede | ||
!style="text-align: center; font-weight: bold; background-color:#145E3D;"| | !style="text-align: center; font-weight: bold; background-color:#145E3D;"|Derde | ||
|- | |- | ||
!style="text-align: center; font-weight: bold; background-color:#145E3D;"| | !style="text-align: center; font-weight: bold; background-color:#145E3D;"|Beloningskist 1 | ||
!style="text-align: center; font-weight: bold;"|Free | !style="text-align: center; font-weight: bold;"|Free | ||
!style="text-align: center; font-weight: bold;"|50[[File:Stpatrick image currency event.png|link=|25px]] | !style="text-align: center; font-weight: bold;"|50[[File:Stpatrick image currency event.png|link=|25px]] | ||
!style="text-align: center; font-weight: bold;"|100[[File:Stpatrick image currency event.png|link=|25px]] | !style="text-align: center; font-weight: bold;"|100[[File:Stpatrick image currency event.png|link=|25px]] | ||
|- | |- | ||
!style="text-align: center; font-weight: bold;background-color:#145E3D;"| | !style="text-align: center; font-weight: bold;background-color:#145E3D;"|Beloningskist 2 | ||
!style="text-align: center; font-weight: bold;"|50[[File:Stpatrick image currency event.png|link=|25px]] | !style="text-align: center; font-weight: bold;"|50[[File:Stpatrick image currency event.png|link=|25px]] | ||
!style="text-align: center; font-weight: bold;"|100[[File:Stpatrick image currency event.png|link=|25px]] | !style="text-align: center; font-weight: bold;"|100[[File:Stpatrick image currency event.png|link=|25px]] | ||
!style="text-align: center; font-weight: bold;"|250[[File:Stpatrick image currency event.png|link=|25px]] | !style="text-align: center; font-weight: bold;"|250[[File:Stpatrick image currency event.png|link=|25px]] | ||
|- | |- | ||
!style="text-align: center; font-weight: bold;background-color:#145E3D;"| | !style="text-align: center; font-weight: bold;background-color:#145E3D;"|Beloningskist 3 | ||
!style="text-align: center; font-weight: bold;"|100[[File:Stpatrick image currency event.png|link=|25px]] | !style="text-align: center; font-weight: bold;"|100[[File:Stpatrick image currency event.png|link=|25px]] | ||
!style="text-align: center; font-weight: bold;"|250[[File:Stpatrick image currency event.png|link=|25px]] | !style="text-align: center; font-weight: bold;"|250[[File:Stpatrick image currency event.png|link=|25px]] | ||
!style="text-align: center; font-weight: bold;"|500[[File:Stpatrick image currency event.png|link=|25px]] | !style="text-align: center; font-weight: bold;"|500[[File:Stpatrick image currency event.png|link=|25px]] | ||
|- | |- | ||
!style="text-align: center; font-weight: bold; background-color:#145E3D;"| | !style="text-align: center; font-weight: bold; background-color:#145E3D;"|Beloningskist 4 | ||
!style="text-align: center; font-weight: bold;"|250[[File:Stpatrick image currency event.png|link=|25px]] | !style="text-align: center; font-weight: bold;"|250[[File:Stpatrick image currency event.png|link=|25px]] | ||
!style="text-align: center; font-weight: bold;"|500[[File:Stpatrick image currency event.png|link=|25px]] | !style="text-align: center; font-weight: bold;"|500[[File:Stpatrick image currency event.png|link=|25px]] | ||
!style="text-align: center; font-weight: bold;"|1000[[File:Stpatrick image currency event.png|link=|25px]] | !style="text-align: center; font-weight: bold;"|1000[[File:Stpatrick image currency event.png|link=|25px]] | ||
|- | |- | ||
!style="text-align: center; font-weight: bold;background-color:#145E3D;"| | !style="text-align: center; font-weight: bold;background-color:#145E3D;"|Beloningskist 5 | ||
!style="text-align: center; font-weight: bold;"|500[[File:Stpatrick image currency event.png|link=|25px]] | !style="text-align: center; font-weight: bold;"|500[[File:Stpatrick image currency event.png|link=|25px]] | ||
!style="text-align: center; font-weight: bold;"|1000[[File:Stpatrick image currency event.png|link=|25px]] | !style="text-align: center; font-weight: bold;"|1000[[File:Stpatrick image currency event.png|link=|25px]] | ||
!style="text-align: center; font-weight: bold;"|2000[[File:Stpatrick image currency event.png|link=|25px]] | !style="text-align: center; font-weight: bold;"|2000[[File:Stpatrick image currency event.png|link=|25px]] | ||
|- | |- | ||
!style="text-align: center; font-weight: bold;background-color:#145E3D;"| | !style="text-align: center; font-weight: bold;background-color:#145E3D;"|Beloningskist 6 | ||
!style="text-align: center; font-weight: bold;"|1000[[File:Stpatrick image currency event.png|link=|25px]] | !style="text-align: center; font-weight: bold;"|1000[[File:Stpatrick image currency event.png|link=|25px]] | ||
!style="text-align: center; font-weight: bold;"|2000[[File:Stpatrick image currency event.png|link=|25px]] | !style="text-align: center; font-weight: bold;"|2000[[File:Stpatrick image currency event.png|link=|25px]] | ||
Versie van 25 feb 2020 11:18

Ze hebben jouw hulp gevraagd om een groots festival op te zetten!
Het St. Patrick's Day evenement introduceert een gloednieuwe en unieke manier om geweldige avatars, prestaties en gebouwen als beloningen te verzamelen! Jouw taak is om de inwoners van die stad te helpen met de voorbereidingen voor het feestelijke moment, en het lijkt erop dat er een hoop te doen is! Paddy McCharms is de festivalgids, luister dus naar hem terwijl hij je de stad laat zien en de inwoners aan je voorstelt die jou zullen helpen om het meest fantastische St. Patrick's Day festival ooit te geven!
Hoe doe ik mee aan het St. Patrick's Day evenement?
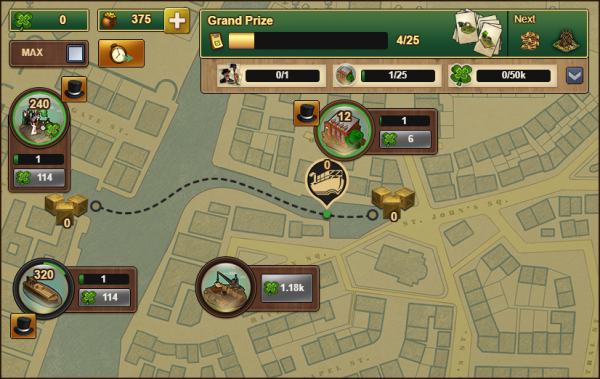
Kaart
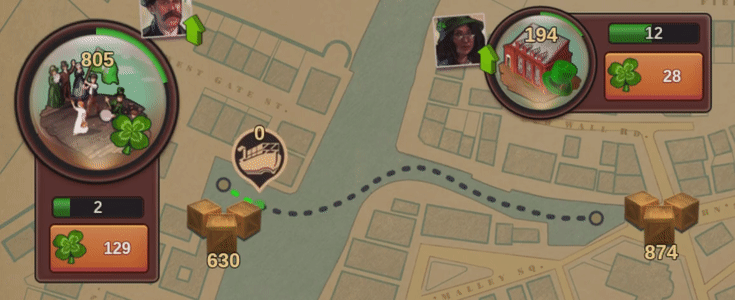
Bij het openen van het evenementscherm zie je een kaart van de stad. Aan de linkerkant van de stadskaart in het evenementscherm heb je het festival met de fabrieken van de stad in het midden daarvan. Klik op de eerste fabriek om te beginnen met de productie van goederen voor het festival. Wanneer de productie is voltooid zal het automatisch in containers worden geplaatst om opgehaald te worden. Klik op het schip linksonderin om het op weg te sturen om goederen op te halen van de stad en af te leveren bij het festival. Wanneer de boot weer terug is bij het festival kan je er op klikken om de goederen te verkopen aan het festival waarmee je wat klavertjes verdient ![]() !
!
Klavertjes ![]() worden gebruikt om jouw fabrieken te verbeteren, waarmee je de productie verhoogt. Je kan ook jouw boot verbeteren of het festival, om de hoeveelheid goederen die worden verplaatst te verhogen of de hoeveelheid goederen die het festival kan verwerken te verbeteren. Wanneer je veel veel klavertjes
worden gebruikt om jouw fabrieken te verbeteren, waarmee je de productie verhoogt. Je kan ook jouw boot verbeteren of het festival, om de hoeveelheid goederen die worden verplaatst te verhogen of de hoeveelheid goederen die het festival kan verwerken te verbeteren. Wanneer je veel veel klavertjes ![]() hebt verzameld en de producties niet 1 voor 1 wil verhogen kan je de 'max' optie in de linker bovenhoek gebruiken om ze sneller te upgraden! Je kan potten goud
hebt verzameld en de producties niet 1 voor 1 wil verhogen kan je de 'max' optie in de linker bovenhoek gebruiken om ze sneller te upgraden! Je kan potten goud ![]() uitgeven om direct 2, 4 of 8 uur aan productie te ontvangen via de stopwatch linksbovenin, een snelle manier om wat extra klavertjes
uitgeven om direct 2, 4 of 8 uur aan productie te ontvangen via de stopwatch linksbovenin, een snelle manier om wat extra klavertjes ![]() te produceren!
te produceren!
Het festival

|
The festival is where you sell all your goods and gets shamrocks |
|---|
De scheepswerf

|
The Shipyard is where you maintain and expand your Ferry. This costs shamrocks |
|---|
Goederengebouwen
There are five different goods buildings. Each produces different amounts of festival goods. The Hat factory is available immediately when the event starts, and the other four can be unlocked by spending shamrocks ![]() .
.
When a building becomes available it will be at level 1. You can use shamrocks to increase the production in your buildings. While every single level will increase the production of your building, reaching certain tiers will unlock production multipliers.
| Levels | Verhoging |
|---|---|
| 1-10 | 1 |
| 11-25 | 2 |
| 26-50 | 4 |
| 51-100 | 8 |
| 101-200 | 16 |
| 201-300 | 32 |
| Gebouw | Omschrijving | Kosten |
|---|---|---|

|
Hoedenfabriek. | Gratis |

|
Bloemenfabriek. | 1.1K |

|
Taartenfabriek. | 1.2M |

|
Drankfabriek. | 1.5B |

|
Vuurwerkfabriek | 111B |
Managers
Click on the top hat to hire a manager for Pots of Gold. Hiring a manager automates the productions of goods, meaning you don't have to click on your factory anymore. And not only that, it will also improve the factory's output even further! Hire a Festival Manager to automatically manage the festival on your behalf, and a Shipyard Manager, to automate the shipment of goods to the festival.
| Levels |  Festival Manager Festival Manager
|
 Scheepswerf Manager Scheepswerf Manager
|
 Hoedenfabriek Manager Hoedenfabriek Manager
|
 Bloemenfabriek Manager Bloemenfabriek Manager
|
 Cakefabriek Manager Cakefabriek Manager
|
 Drankfabriek Manager Drankfabriek Manager
|
 Vuurwerkfabriek Manager Vuurwerkfabriek Manager |
|---|---|---|---|---|---|---|---|
| Level 1 | 20 |
20 |
10 |
20 |
30 |
40 |
50 |
| Level 2 | 40 |
40 |
20 |
40 |
60 |
80 |
100 |
| Level 3 | 80 |
80 |
30 |
60 |
90 |
120 |
150 |
| Level 4 | 150 |
150 |
50 |
100 |
150 |
200 |
250 |
| Level 5 | 300 |
300 |
100 |
200 |
300 |
400 |
500 |
Missiereeks
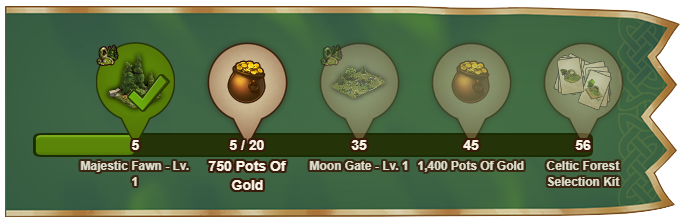
You need to complete quests to earn Pots of Gold. There are 56 quests to complete, 35 rush quests, and then 1 quest for each day of the event. You can also find even more Pots of Gold in incidents around your city. Use the Pots of Gold in the main event window to prepare for the celebrations. You can also purchase additional Pots of Gold for Diamonds if you need some more.
Beloningen
Voltooide stad beloningen
When you are ready to move on to the next town, either because you have completed all the quest in the current one or you just want to move on then click on the next town button. The button can be found in the bottom right corner of the Event Window. It becomes active once you have an available balance of 8.4 Quadrillion (8.4Q) Shamrocks.
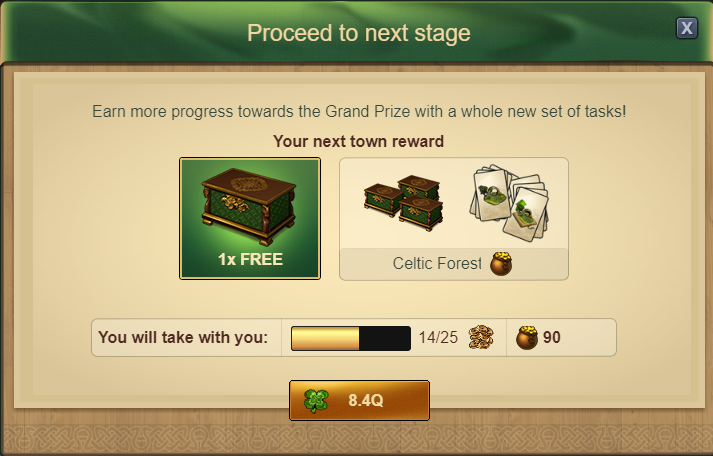
Moving to the next town will cost![]() 8.4 Quadrillion Shamrocks and you will be asked to confirm you wish to move on before being presented with a choice of end of stage reward boxes.
8.4 Quadrillion Shamrocks and you will be asked to confirm you wish to move on before being presented with a choice of end of stage reward boxes.

All the available prizes from each box are shown on the left hand side of the screen. The first reward box you open is free but if you want to try your luck and open another it will cost Pots of Gold ![]() .
.
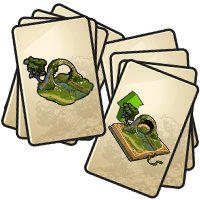
If you chose to open all 6 reward boxes, you will receive a Celtic Forest Selection Kit for free. Once you do that you will be presented with 6 new reward boxes which you can chose to open by spending pots of gold or you can move on and start the next stage in a new town by clicking the continue button.

The table below details the cost of opening reward boxes from the end of stage collection screen. The costs continue to scale with each new set of 6 reward boxes.
| Beloningskist | Eerste | Tweede | Derde |
|---|---|---|---|
| Beloningskist 1 | Free | 50 |
100 |
| Beloningskist 2 | 50 |
100 |
250 |
| Beloningskist 3 | 100 |
250 |
500 |
| Beloningskist 4 | 250 |
500 |
1000 |
| Beloningskist 5 | 500 |
1000 |
2000 |
| Beloningskist 6 | 1000 |
2000 |
4000 |
Keltische gebouwenset
Het ![]() Keltisch woud is een gebouwenset die uit 5 verschillende gebouwen bestaat die naar een tweede niveau kunnen worden verbeterd.
Keltisch woud is een gebouwenset die uit 5 verschillende gebouwen bestaat die naar een tweede niveau kunnen worden verbeterd.

| Majestueus hertenkalf - niv. 1 | Majestueus hert - niv. 2 | Staande steen - niv. 1 | Staande steen - niv. 2 |
|---|---|---|---|
 |
 |
 |
 |
|
0 |
0 |
0 |
0 |
| Druïdenwilg - niv. 1 | Druïdenwilg - niv. 2 | Heksenkringen - niv. 1 | Heksenkringen - niv. 2 |
 |
 |
 |
 |
|
0 |
0 |
0 |
0 |
| Maanpoort - niv. 1 | Maanpoort - niv. 2 | ||
 |
0 |
 |
0 |
Upgraden van het Keltisch woud
Om een van de setgebouwen van het Keltisch woud te upgraden heb je een unieke upgradekit nodig voor elk gebouw. Als alternatief kan je ook de Keltisch woud selectiekit gebruiken om een van de setgebouwen te upgraden.
|
 Upgradekit voor majestueus veulen |
|
 |
 Staande steen-upgradekit |
 |
 |
 Upgradekit voor druïdenwilg |
 |
 |
 Upgradekit voor feeënringen |
 |
 |
 Maanpoort-upgradekit |
 |
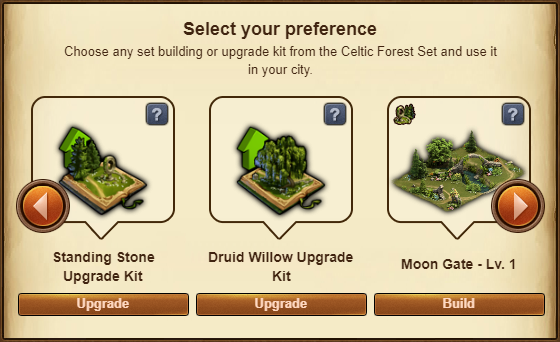
Keltisch woud selectiekit
Wanneer je de Keltisch woud selectiekit gebruikt zal er een scherm worden geopend die je in staat stelt om een van jouw bestaande Keltisch woud gebouwen naar level 2 te upgraden of een nieuw level 1 gebouw te plaatsen.
Kies "Bouw" om het gebouw direct in jouw stad te plaatsen. Kies "Upgrade" om een bestaand level 1 gebouw in jouw stad te upgraden.
St. Patrick's Day Avatars
Er zijn twee avatars die je kan verzamelen via de missiereeks.
 Cathleen Cathleen
|
 Micky Micky
|