Gilde vs Gilde
Neem deel aan de strijd!
In GvG vecht jouw gilde tegen andere gildes voor overleving en macht. Het doel is om het gebied dat gecontroleerd wordt door je gilde uit te breiden, het gildeniveau te verhogen en bonussen te verdienen voor alle gildeleden.
Elke dag kan jouw gilde nieuwe sectoren veroveren en sectoren die ze al in handen heeft verdedigen. Op het einde van de dag (wanneer de timer afloopt) wordt de macht van je gilde berekend. Deze macht draagt bij tot het niveau van je gilde. Hoe hoger het niveau van je gilde, hoe beter de beloningen!
Om deel te nemen aan GvG moet je de ijzertijd hebben bereikt en deel uitmaken van een gilde - de grootte of rang van je gilde speelt geen rol. GvG-gevechten leveren ook gevechtspunten op, zodat je niet hoeft te kiezen tussen de PvP-torens en GvG.
GvG is alleen beschikbaar op de desktop versie van het spel
Om de GvG-functie te openen klik je op het bijbehorende icoontje in je menubalk:
Gildecontinentkaart
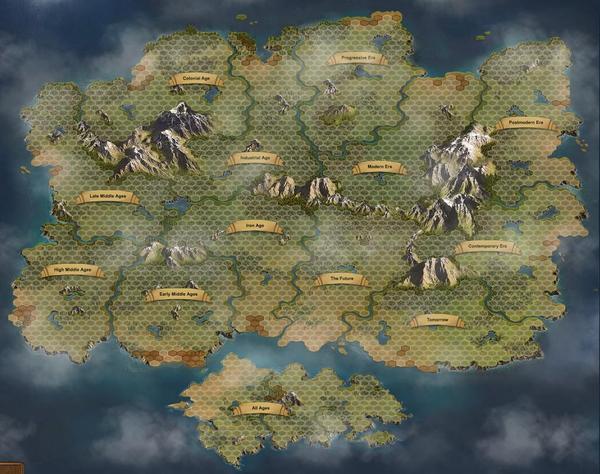
Alle acties vinden plaats op de gildecontinentkaart, die speciaal is ontwikkeld voor gildegevechten. Rivieren en bergen delen deze continentkaart op in verschillende provincies. Alle provincies behalve een enkele representeert een tijdperk - de provincie onderin is de speciale "Alle tijdperken" provincie.
De GvG continentkaart zorgt ervoor dat je een snel overzicht hebt van de invloed van jouw gilde in verschillende provincies en zorgt er ook voor om deze provincies binnen te komen, waar jouw gilde zal kunnen strijden. In de afbeelding hieronder kan je zien hoe de invloed van jouw eigen gilde is getoond in groen en tegenstanders zijn getoond in het rood. Gebieden in wit geven een gebied aan dat NPC's (non playing characters, niet meespelende karakters) bezitten, waar gilden nog kunnen uitbreiden.
Je gilde kan vechten in slechts een provincie of meerdere provincies... de keuze is aan jullie! Maar je moet er wel rekening mee houden dat elke provincie een tijdperk in het spel vertegenwoordigt, waardoor je in die provincie enkel eenheden en goederen uit dat tijdperk kan gebruiken. Zo mag je in de ijzertijd-provincie enkel eenheden en goederen uit de ijzertijd gebruiken. Eenheden of goederen uit een tijdperk lager/hoger zijn hier dus niet inzetbaar.
Alle tijdperken provincie
Helemaal onderin de kaart is er een kleinere, speciale provincie voor alle tijdperken. In deze provincie kan je eenheden van elk tijdperk gebruiken in gevechten. Het is niet mogelijk om goederen te gebruiken op deze kaart, de belegeringskosten en de kosten voor het plaatsen van verdedigende eenheden worden betaald met medailles.
Provinces
Het is op de provinciekaart waar de actie zich afspeelt en je gilde kan samenwerken om nieuw gebied te veroveren.
Sectors
De provinciekaart is ingedeeld in sectoren, die worden weergegeven door hexagonen (zeshoeken). Je gilde kan deze sectoren veroveren en ze verdedigen tegen belegeringen van anderen. Eerst beleger je een sector die je vervolgens aanvalt.

De kleur van een sector toont wie die sector bezit:
- Rood - Vijandig gilde
- Groen - Jouw gilde.
- Wit - Neutraal (NPCs)
Landingsgebied
Wanneer je in de gildeprovinciekaart een tijdperk opent, zul je merken dat een deel van de kaart donker is, wat duidt op onontgonnen, niet opgeëist gebied. Het actieve gebied is waar je je eerste leger kunt landen en het hoofdkantoor van je gilde kunt vestigen.
Welke sectoren aanvallen?
Wanneer je voor het eerst een provinciekaart betreedt, kan je een belegeringsleger plaatsen in elk van de sectoren in de landingszone (wit gebied), of op een riviersector naast of in het gebied van een ander gilde. De rest van de hexen behoren nog steeds tot de NPC's, maar kunnen alleen worden aangevallen als je een aangrenzende hexagoon hebt.
Sectorstatus
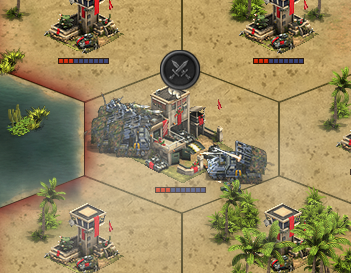
Je kunt op de kaart hierboven zien of een sector wordt belegerd, omdat er een pictogram met gekruiste zwaarden boven staat. Een schildpictogram boven een sector betekent dat de sector is beschermd, omdat deze onlangs is veroverd en momenteel niet kan worden aangevallen. Beschermde sectoren tellen ook niet mee voor het aanvallen en plaatsen van belegeringslegers. Dit betekent dat als je maar één beschermde sector hebt naast een vijandelijke sector die je wilt aanvallen, je moet wachten tot de bescherming van je sector is opgeheven voordat je daar je belegeringsleger kunt inzetten.
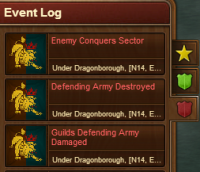
gebeurtenissenlogboek
Het gebeurtenissenlogboek registreert acties die zijn gemaakt door je eigen gildeleden en vijandelijke gilden. Je hebt er toegang toe vanaf de provinciekaart door op de gebeurtenislogboekknop in het menu linksonder op het scherm te klikken.
Er zijn drie verschillende tabbladen beschikbaar in het logboek:
- Belangrijke gebeurtenissen
- Je gilde-acties
- Vijandelijke gilde-acties
Als je op een tabblad in het gebeurtenislogboek klikt, wordt een lijst met recente gebeurtenissen weergegeven en waar deze gebeurtenisen plaatsvonden. Als je op de logboekvermelding klikt, wordt de kaart op dat gebied gecentreerd.
Sectors
Je kan informatie over een sector bekijken door uw muis erover te bewegen in de provinciekaart. Wanneer u een sector bestuurt, krijgt u "macht" die u kunt zien in de sectorinformatie. Verschillende sectoren bieden meer of minder kracht en, naarmate je kracht wint, wordt dit omgezet in ervaringspunten voor je gilde, die worden gebruikt om je gildelevel te verhogen.
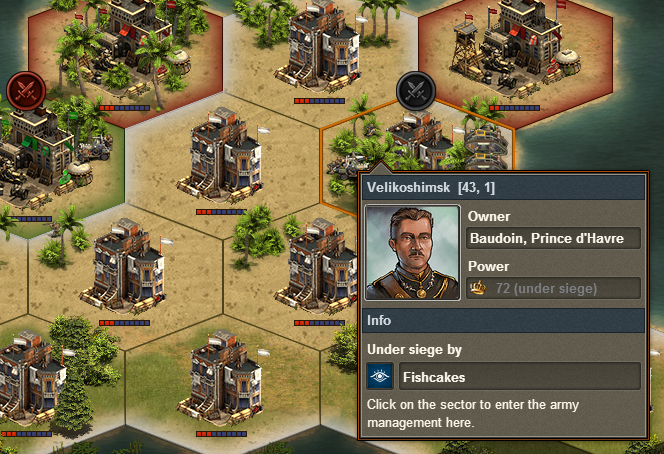
De witte kleur van de hexagoon in de afbeelding geeft aan dat de sector wordt bestuurd door een NPC. Je kan ook de coördinaten van het gilde zien (handig om strategieën te communiceren met je gildeleden!), de macht, en als de sector wordt belegerd, wordt ook informatie over de belager getoond.
Sector opties
Als je op een sector klikt, zijn de weergegeven opties afhankelijk van of de sector tot je gilde behoort, of een vijandelijke gilde deze controleert, of een NPC (in dat geval worden er geen opties weergegeven). Afgebeeld is een voorbeeld van sectoropties voor een van de sectoren van je eigen gilde.
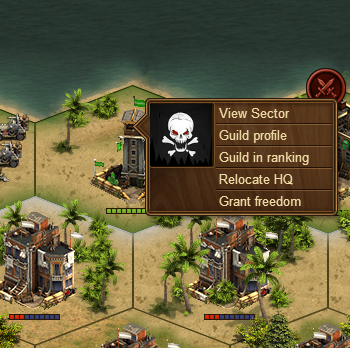
Als je op de optie 'Profiel' klikt, ga je naar het profiel van je gilde en 'Gilderanglijst' zal het scherm met de ranglijst van gilde openen.
Verplaats Hoofdkwartier
Elke dag wordt eerst je ondersteuningsbonus toegepast op het hoofdkwartier, die de sterkste bonus krijgt, en vervolgens op aangrenzende sectoren, welke spiraalsgewijs naar buiten toe lopen. Dit maakt je hoofdkwartier tot een strategisch centrum dat je gilde af en toe kan laten verhuizen. Als je op de knop Verplaats Hoofdkwartier klikt, wordt je Hoofdkwartier naar de gekozen locatie verplaatst, maar dit kan slechts één keer per dag worden gedaan. Merk op dat de ondersteuningsbonussen voor sectoren niet zullen veranderen tot de volgende dagelijkse berekening.
Geef vrijheid terug
Als een sector niet langer strategisch nuttig is voor je gilde, kun je ervoor kiezen om deze weer vrij te geven. Dit zal ertoe leiden dat de sector wordt bestuurd door een NPC en dat er goederen worden uitbetaald aan je gildeschat, die is gebaseerd op het gebied dat eigendom is van je gilde en het aantal belegeringslegers dat het heeft geplaatst. Onthoud dat elke "vertrouwde" speler slechts vier sectoren per dag vrijheid kan geven.
Verover een sector
Betreed een vijandelijke sector door op de hexagoon te klikken en de optie "bekijk sector" te selecteren (de optie "bekijk sector" kan je overslaan wanneer je een door NPC bestuurde sector betreedt), dit brengt je naar het legerbeheerscherm. Rechtsboven in het scherm is een ruimte waar je legers naar de sector kunt inzetten. Er zijn twee mogelijke opties om legers in te zetten: belegeringsleger (als je de sector niet bezit) en verdedigingslegers (als de sector in je bezit is). Omdat we de sector proberen te veroveren, moet je in dit geval eerst een belegeringsleger willen inzetten.
Een belegeringsleger inzetten
Voordat je kunt beginnen met aanvallen, moet je de sector eerst opeisen die je wilt veroveren. Het inzetten van het eerste belegeringsleger van je gilde kost goederen en het benodigde hoeveelheid goederen wordt weergegeven als je de muisaanwijzer op de inzetknop beweegt.
Een sector aanvallen
Als je eenmaal aanspraak hebt gemaakt op de sector die je wilt en je belegeringsleger hebt ingezet, kunnen de aanvallen deze beginnen te veroveren! Een enkele aanval is waarschijnlijk niet voldoende en er kunnen veel opeenvolgende aanvallen nodig zijn om de controle over een sector te krijgen. Je moet je eigen leger gebruiken om aan te vallen ... je kunt niet aanvallen met het belegeringsleger. Klik op het rode verdedigingspictogram in het legerbeheerscherm om de verdedigingslegers van je vijand te zien.
It's possible to have up to 8 armies defending a sector, and you need to defeat them all to gain control of the sector. In this case there are two defending armies. Each time you attack, your army will fight against a random defending army (you cannot choose which army to attack). Below the army's icon, you can see the army's health bar. The armies in the picture have 8 and 9 health respectively, which means they need to be defeated 17 times total in battle to be utterly destroyed and removed from your opponent's defending armies. Beware - you need to defeat each army multiple times for it to be completely destroyed. When you have killed all of your opponent's defending armies, your siege army moves in and becomes the sector's first defending army.
HINT: After you have beaten a defending army for the first time, the units in the army become visible when you hover your mouse over the army's icon in the army management screen. Once the army has received damage, the units in that army are visible to everyone. Another guild has laid siege to the sector I want / I own
You may find that another rival guild has laid claim to a sector you want or that belongs to your guild, and placed a siege army there. All is not lost! You can attack and destroy your enemies' siege armies in much the same manner as you destroy defending armies.
After you win a sector
After you have gained control of a sector, it is protected from attack for a period of time, until the end of the "day", which is indicated by a countdown timer at the top left of the province map. When the countdown reaches zero, the day ends and scores are calculated for the previous day. The protection is also lifted. It's in your interests to hold on to a sector until the timer runs out!
Defending a sector
Every day when the countdown runs out, scores are calculated for the previous day. You need to be holding on to a sector when the timer runs out for it to count! So, it's in your interests to hold on to a sector for as long as you can, or at least until the timer reaches zero.
When you conquer a sector you start with only one defending army (which was formerly your siege army). You can place up to seven additional armies in the empty slots, making a total of eight. But you need to pay goods to unlock each army slot, and the cost increases with every slot you unlock.
As with siege armies, units deployed to defensive armies belong to your guild and cannot be retrieved. As the cost of goods rises, a single person may no longer be able to afford to unlock slots, and so goods contributing to unlock slots go into a guild treasury, which holds goods until they are ready for use.
Under siege
When one of your sectors is under siege by an enemy, the sector will not produce power. Most actions are also blocked (placing a defending army, relocate HQ or grant freedom). So, it's in your guild's interest to kill off any armies that are besieging your sectors.
Support pool
Every guild has a "support pool", which gives bonuses in GvG warfare. A guild's support pool is calculated from the guild's level and certain buildings that its members have. It gives a percentage bonus to the attack and defense of all units of that guild in this sector.
The support pool is distributed among sectors controlled by a guild, with the guild HQ taking precedence, before adjacent sectors receive a bonus, and then sectors further away after that. You can see a support bonus by hovering your mouse over an army. Defending armies and siege armies can have a support bonus if they are in range. A guild's support pool is recalculated every day, when the countdown ends.
HINT: Your guild HQ has the highest support bonus, reducing the further away you get from your HQ.
Daily calculation
The daily calculation occurs at a set time every day. You can see from the countdown in your GvG province map how much time is left until the calculation is run. During the calculation, the following steps occur:
- Guild Level calculation.
- Guild ranking calculations.
- Support Pool/Support Bonus calculation
- Power is paid out.
- Attack protection on sectors is lifted.
- If you have relocated your HQ the previous day, the relocate option is reset and you are again able to move your guild headquarter.
Guild Levels
Leveling up your guild will improve its ranking and give bonuses to all its members. Some bonuses will help your guild in the GvG maps, and there are also player bonuses to be gained. You can view information about your guild’s level, and requirements for all levels, in the guild level window, which is accessible from your guild menu icon.
To see rewards and requirements, you can scroll through the levels using the arrows at the bottom of the guild level window.
How to level up your guild
In order to level up your guild you need to gather power. You gain power by acquiring and holding onto territory. Every sector you control gives power and, at the end of each day, your guild's power points are calculated and added to your guild's total, which contribute towards leveling up your guild.
Guild bonuses - As you increase your guild's level, the following bonuses for your guild will also increase:
Prestige bonus - Adds prestige to the guild’s daily prestige ranking
Support pool bonus - Adds to the guild’s support pool (attack/defense bonus in GvG)
Player bonuses - Some levels will also provide a player bonus.
Recruitment boost - Reduces the time needed to recruit units (new times are shown in the recruitment screen), and healing times for units.
Research boost - Gives additional Forge Points each day in your town hall.
Construction rebate - Reduces coin and supply cost of all buildings by a percentage (the original cost is shown in the research tree, and the reduced cost is displayed in the building menu).
Guild rankings
Two GvG rankings exist: guild ranking, and map ranking. The guild ranking is global and determined by the amount of prestige points a guild has, which your guild can gain from the level bonuses obtained while leveling up your guild. Provinces also have their own map ranking, which is ordered by guilds' power gained in that province map. Getting to the top of the map ranking will not only increase your guild's fame and notoriety, but it also provides its own benefits.
Every day after the new map rankings are calculated, a power bonus is given to the top 3 guilds. The bonus is as follows:
Top guild - 15%
2nd place - 10%
3rd place - 5%
Guild Rights & Treasury
Guild rights
Not all GvG actions are available to all players. The following actions require the guild member to have the "trusted" right:
- Unlocking a defending army slot.
- Replacing an army
- Deploying or deleting a siege army
- Grant freedom (you can only do it 4 times per day)
- Relocate headquarter
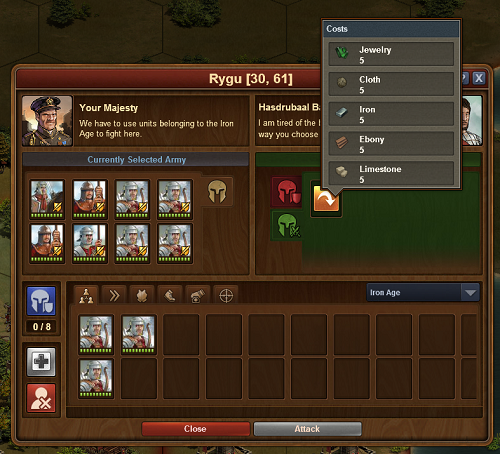
Guild treasury
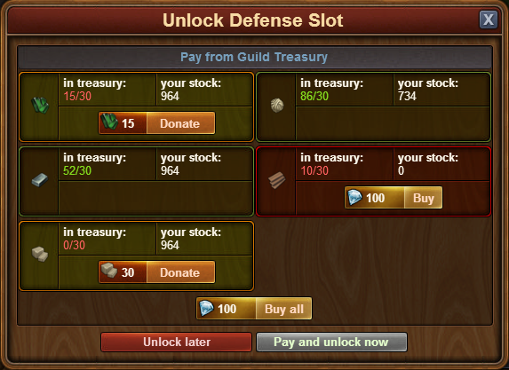
As your guild conquers and expands its territory, goods cost rise. Your whole guild may need to contribute goods to pay for new army deployment and unlock defense slots, and this is where the guild treasury comes in. When you attempt to place an army, you are first taken to the unlock screen, where you can contribute to - your guild's treasury.
In the image below, 30 iron and cloth are required, and as you can see that they are already available in your guild treasury, because the number is shown in green. Also needed are ebony, jewelry and limestone, which the guild need to collect and pay in order to unlock this slot. Buttons beside the good requirement show what you as a player are able to contribute: in this case, 15 jewelry and 15 limestone. And you could also use Diamonds to purchase ebony for your guild. Only when all required goods are available can the slot be unlocked.
HINT: Granting freedom to a sector your guild no longer wants will also result in goods being paid to your guild's treasury
You can also donate goods to your guild's treasury whenever you feel like it in the Treasury screen.
GvG Terms
Here is a list of GvG-related terms that might be useful to know:
Attack protection - After conquering a sector, it cannot be attacked until the next daily calculation. Also, unless it is a HQ, this sector does not count for placing siege armies and attacking until the next daily calculation.
Average power - The average power of a sector in the province.
Besieged, under siege - A sector that holds a siege army. Besieged sectors do not produce power, and most actions are blocked (like placing a defending army, relocate HQ or grant freedom).
Construction Rebate - According to the level of the guild, all guild members get a discount on the coins and supply costs of their buildings.
Coordinates - A unique identifier for every sector on the province map.
Daily Calculation - At the end of every day, during the daily calculation, power is paid out, and attack protection is lifted.
Defending Army - A sector can hold up to 8 defending armies. If the sector gets attacked, each of these armies has to be defeated 10 times.
Grant Freedom - When a guild “grants freedom” to one of their sectors, it and all defending armies in it will become controlled by an NPC again. The guild will gain a few goods for doing so.
Guild Continent Map - The map in which the provinces are located. Entering GvG will lead you there.
Guild Level - The accumulated power of the maps will contribute to the guild level. Whenever enough points are gathered, the guild levels up and unlocks bonuses for their members.
Guild Ranking - A ranking that displays all guilds sorted by their prestige.
Guild Treasury - The guild treasury holds goods that are contributed by the players and certain events/actions. The treasury is used to pay goods for unlocking slots or placing siege armies.
Guild versus Guild - The official name of the feature is “Guild versus Guild”.
Guild’s area - The sectors controlled by a guild in a province.
GvG / GVG - Abbreviation for “Guild versus Guild”.
Headquarter - The first sector a guild conquers on a map will hold the headquarter. The headquarter can be moved to other sectors. It is important for the distribution of the support bonuses. Also, from a headquarter siege armies can always be placed (there is no 24-hour-protection).
HQ - Abbreviation for headquarter.
Landing Zone - A defined area of sectors in every province in which new guilds entering the map can start and place their initial siege army.
Map Ranking - Every province has a map ranking that displays the guilds sorted according to their daily power.
NPC - “Non-playing character” – if a sector is not controlled by a guild, it is controlled by a NPC instead.
Owner - Either the guild or the NPCs name of whoever owns that sector.
Power - A sector produces power during the daily calculation for the guild that owns the sector.
Prestige - Prestige is calculated from the level of a guild and the daily power. It is used for the global guild ranking.
Prestige Bonus - According to the level of the guild, every day the guild will get a certain amount of prestige.
Province - The guild continent map holds the provinces in which the guilds fight. There is one province for each age, meaning only units and goods from that age are used.
Province’s age - The age of a province; according to our normal ages in the game. In a province, only goods and units from the province’s age can be used.
Recruitment Boost - According to the level of the guild, the recruitment and healing times of units are reduced for all guild members.
Relocate Headquarter - A guild can relocate its headquarter; effectively, the headquarter gets put on to another sector of their territory, as long as neither of the two sectors is under siege.
Research Boost - According to the level of the guild, all guild members receive - Every province holds a large number of sectors. Guilds battle for control of these sectors. A sector provides power.
Siege Army - One member of a guild has to place a siege army on an enemy sector first. Placing a siege army requires goods. Only after placing the siege army the defending armies in that sector can be attacked by members of the guild. Note that the siege army itself does not attack, but it can be attacked and defeated.
Support Bonus - All defending armies in a guild’s sector or a siege army can get a buff. That buff is called “support bonus”. It is calculated from the support pool, the support factor and the distance to the headquarter.
Support Factor - A unique factor for every province; support pool / support factor = total support bonus of that province
Support Pool - All guild members contribute with certain buildings to the guild’s support pool. The support pool and the support factor of a province define the total support bonus for the guild in that province.
Support Pool Bonus - According to the level of the guild, the guild’s support pool is increased.
Unlock - Opening up another slot for a defending army (up to 8 in total). This action requires goods.
Unlocked Slot - A slot that was unlocked and can take a defending army now.